Thursday, September 30, 2010

Kaya Puff 加央角


Want some simple and fast snack? Let's puff!

This morning after finished making Kaya jam (Ming Ray has been bugging me to have this coconut egg jam to go with his toasted bread for quite sometimes), then it struck my mind to use this Kaya jam to make Kaya puff.

In fact, I already planned to use yesterday leftover ham and eggs to make a few small puffs for morning tea. In the end, we enjoyed two types of puff for morning tea J
Below is another simple and easy snack idea using ready made puff pastry, go and try it!
Kaya Puff @ 30/09/2010

Tuesday, September 28, 2010

Wanton Tofu Vegetables Soup 云吞豆腐塔菜汤


Back home we seldom appreciate hot soup, we tend to wait for it to get cold to drink it, but once we are here, nothing warms the chill of a cold winter's night as a hearty bowl of hot soup! Sipping a bowl of steaming hot soup is real treat on a cold weather like what we have now.

However, to have a nice soup you need to simmer at least 2-3 hours; it is not convenient to do that on daily basis. So, to have an easy way out, I used to cook a big pot of pork bone and chicken frames stock and then divide the stock into small packets and freezer them. I used one packet for one meal, I just need to heat it up and add in vegetables, dumpling, tofu or fish balls and viola a bowl of hot soup is ready within 10 min for dinner!

I like to add dumpling or wanton in my instant soup. Nowadays, making wanton or dumpling is much easy and simple. Off-the-shelf wanton wrappers are easily available, one just needs to add in mince or veggie filling and wrap them up. But, some of you might say, wrapping wanton/dumpling need skills too! I said not at all, see the photo below, nice?
There is a secret in it, the secret is….ok, I'll let you figure out yourself if you still can't leave me a comment I will review how:-P

Below is my version of 10 minutes (exclude the making of wanton) soup, you can throw in whatever veggie, seafood and meat that you can find from your fridge as you like, just be creative and dare to explore you will surprise to discover new flavor out from ordinary dish!

Monday, September 27, 2010

Fried Udon with Dried Shrimp 虾米炒乌冬面


Rice is my family main staple food, a family of three, my guys at home can eat average 2 cups rice for a meal! But, to me noodles are my choice. I can eat more than a bowl of rice noodles but just a small bowl of rice.

@16/09/2010
Let me started off my series of noodles recipes with Fried Udon with dried shrimp which I had served in one of my lunch sharing gathering. 

Sunday, September 26, 2010

5 Minutes Chocolate Mug cake 5分钟巧克力蛋糕


One of the good thing that I like living in New Zealand is that you get to have many opportunities to attend free workshops and courses which fully sponsored by local councils and government. Other than free Computing certificate that I'm on 3 days a week, I also participated in one of this Healthy Eating on a Budget workshop which is organized by Auckland North Shore Women Center.

This once a month workshop is more an interactive cooking class to show us how to make budget and healthy meals. I had benefit from this workshop by learning up quite a number of new Western meals since I registered last November 2009.

Last Friday, our lovely cooking instructor has shown us to make a super fast and easy treat dessert – Chocolate Mug cake. Well, sometimes among the healthy meals there are some treat desserts, one can't really resist that temptation even though we need to stay healthy right J

Yesterday, just after I came back from my morning jog, Ming Ray came to me asking for snack. It struck my mind to have mother and son cooking time by teaching him this super easy new recipe that I had just learnt. It only took us cooked from whoa to go in 5 minutes! My little master chef even decorated his master pieces with a scoop of vanilla ice cream and top with colorful jelly beans. J


5 minutes Chocolate Mug Cake

5 Minutes Chocolate Mug cake
This is perfect for a treat dessert for one ( or two if you want to feel slightly more virtuous)

Ingredients:
4 Tbsp plain flour
4 Tbsp sugar
2 Tbsp cocoa powder
1 egg (lightly beaten)
3 Tbsp milk
3 Tbsp oil (Do not use strong flavor oil – Peanut Oil )
Small splash vanilla essence
1 large coffee mug/small jug/bowl

Method:
1.Add dry ingredients to mug and mix well.
2.Add the egg and mix thoroughly.
3.Pour in the milk and oil and mix well.
4.Add the vanilla essence and mix again.
5.Put the mug in the microwave and cook for 3 minutes on high. The cake might rise over the top of the mug, but don't be alarmed! Allow to cool a little and tip out onto a plate if desired.

Notes:
If you are not weight watcher, it will be delicious to serve with whipped cream or ice cream or chocolate syrup onto the cake and decorate it with cherry or strawberry on top to serve. Let your creativity mind run! Cooking is another form of art too!

5分钟巧克力蛋糕

材料:

4汤匙普通面粉
4汤匙糖
2汤匙可可粉
1粒鸡蛋 (鸡蛋打散)
3汤匙牛奶
3汤匙油(不要使用味道重的油- 花生油)
香草精
一个大咖啡杯/碗

方法:
1。把干配料添加到杯拌匀。
2。添加鸡蛋调匀。
3。加上牛奶和油,添加香草后把全部材料搅拌均匀。
5。放进微波高温煮3分钟。蛋糕可能会上升超过了杯子的顶部,但不要惊慌!
允许冷却才倒到一个盘子上。

注释:
如果体重不是重点, 那加些美味的奶油,巧克力浆或冰淇淋在蛋糕上, 再装饰樱桃或草莓上面。运用你的创意吧!烹饪是另一种艺术呢!

Wednesday, September 22, 2010

Muah Chee (Steamed Glutinous Paste with Peanut) 花生芝麻糍粑


Muah Chee is one of my favorite childhood desserts. During one gathering, I showed off my cook books to my Auckland friends' Cheng Im and Cheng Ee (whom also came from Penang). When we flipped to the page of Muah Chee, all of us exclaimed the same remarks "I missed this food!" So, on one easy Sunday afternoon, we gave it a try and it was another success.

When I tasted the muah chee, it brought back so many good old childhood memories. I recalled when I was small, nearly once a week, there was an old hawker cycling around our neighborhood and yelling "Muah Chee" and the kids would rushed out with coins in their hands lining up to buy this delicious peanut coating glutinous balls from him. Those were the days; now you hardly find muah chee selling off street.

In fact, before we moved here I did request Ming Ray's nanny to teach me to make muah chee. However, her method was much tiring. Instead of steaming she boiled the dough. Once the dough is cooked and float on the water, removed and while it is still hot, you need to keep stirring until smooth. I found this method was quite tiring and you need strong hands to do the stirring, as the glutinous dough was too sticky and hard to move.

This recipe is much easier, even the recipe requested you to stir after steaming the dough, if you have no strength to stir till smooth don't bother, once you coat the dough with peanut who will notice whether the dough is smooth or not. The only tedious part is to make ground peanuts, but if you get to buy the readymade ground peanut, it does save you lots of time and hassle.

I didn't have time to take a nice photo for this dessert; we finished it before I can even get a nice photo out from them! J (Move mouse over the photo to see the steamed dough)
@15/07/2010

Tuesday, September 21, 2010

Snowy Mooncakes 冰皮月饼


Follow up on my mooncakes series, this is another famous type of mooncakes Snowy Mooncakes 冰皮月饼 which originated from Hong Kong back in early 1980s. This mooncake is much easier to make, no baking is required and you can straight away put in your mouth once you have finished molding the filling into the mooncakes dough!

Credit goes to Helen again on her recipe and photo sharing. Tomorrow is Mooncakes Festival, you still have time to do your homemade Snowy Mooncakes as it can be ready in less than 2 hours time.  (Move mouse over the photo to see more )
Snowy Mooncake
Helen's Snowy Mooncakes @ 21/09/2010

Monday, September 20, 2010

Nam Yee baked Pork Chops南乳猪排


When we planned for our move here, I insisted to bring over some of my favorite Malaysian  cook books. Now, I'm so glad we did even though they were so heavy to carry over. These cook books are now my cooking bibles. Not only they gave me ideas what to serve on our dinner table; they too helped me gain popularity among my new circles of friend by introducing unique Malaysian food to them.

My number one choice of these cook books are series of cook books which featured Malaysia Hawkers' dishes. Below is another version of oven baked pork chop which I improvised based on one of these cook books. I followed their Nam Yee (南乳) seasoning but instead of deep fry I used oven baked, which is much healthier and easier.
(Move mouse over the photo to see more photo)
@15/09/2010 dinner

Friday, September 17, 2010

Mooncakes 豆沙莲蓉月饼


Next Wednesday 22/09/2010 will be Mooncake festival which also known as mid autumn festival 中秋节. In fact, local Asian shops started selling moon cake a month ago. I was a bit surprised that mooncakes are  easily available here in Auckland. However, the price was not cheap, but since we are not keen moon cake eaters, we do not miss much at all.

It didn't cross my mind to learn up mooncake making at all not until Helen brought her homemade mini mooncakes for us to taste. Her homemade vegetarian mooncake was really delicious and when I read her recipe, the making process was not that complicated after all.

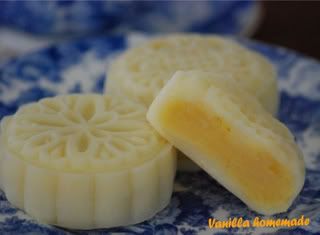
So, I suggested having a fun moon cake making at my house when I host cooking club lunch sharing on yesterday, Thursday 16/09/2010. After I dropped off Ming Ray to school, I started to made the pastry 2 hours before hand. When Master Chef Helen and the rest of 8 others cooking members came for lunch, we were ready to process the mooncakes. We made 2 types of mooncakes one was the traditional baked type and another was Snowy mooncakes 冰皮月.

In this article I only shared traditional baked mooncakes, the snowy mooncakes 冰皮月 will follow later. Credit goes to Helen for her time and recipes sharing with us. Check out Helen's master pieces which I took for her @ 06/09/2010 and those we made at our house, you can noticed what a huge different right?

I have not taste the mooncakes yet, cause the mooncakes need to rest for at least 3 days before serving to allow the oil to sip back. Fingers crossed they will taste as yummy as what Helen served us last week, I will update this Sunday :-)
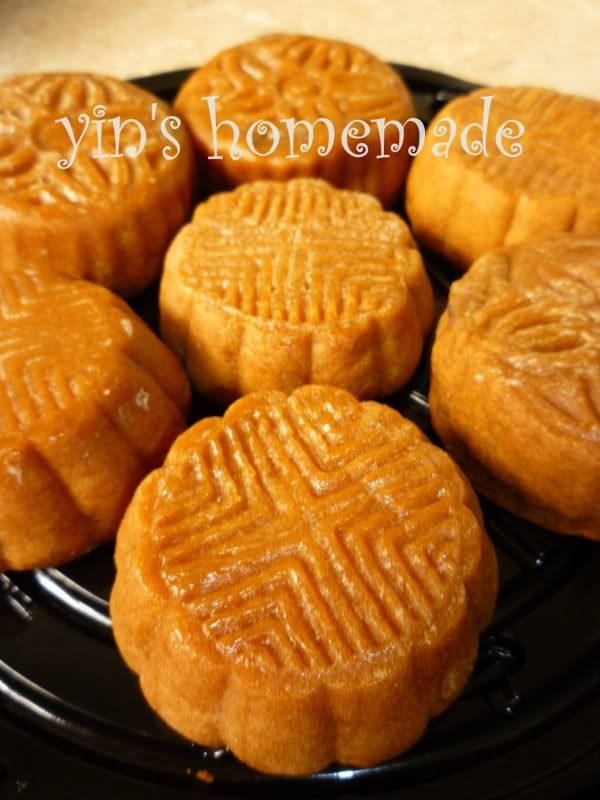
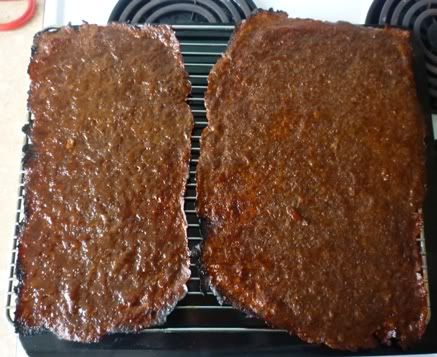
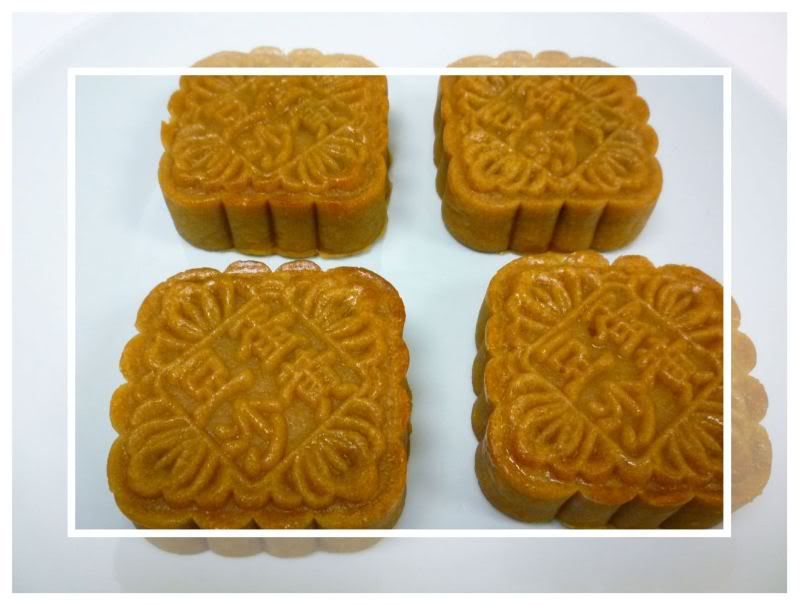
Freshly baked @ 16/09/2010 (Can't eat till Sunday 19/09/2010)
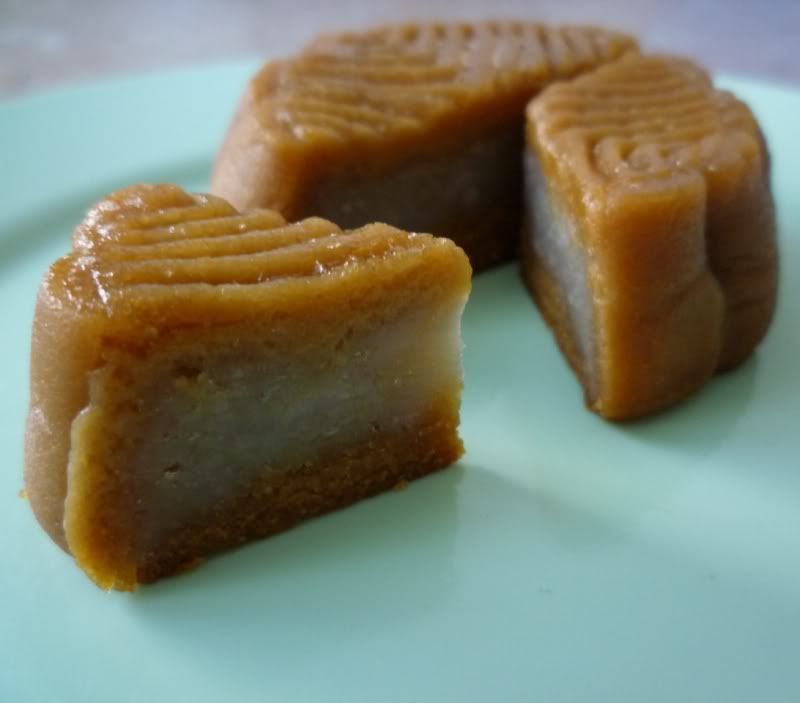
Updates 20/09/2010:
Just ate one of the mooncake with taro fillings , Ming Ray had his with red bean paste which he thought was chocolate hahaha... I had given out 15 of them to friends :-)


Mooncakes 豆沙莲蓉月饼

Ingredients:

Plain flour 600g
Cooking oil 200g 180g
( I had reduced the oil , as I found original recipe a bit too oily and dough too soft to mould)
Golden syrup 360g
Lye water (gan shui) 2tsp
1 egg for glazing (lightly beaten)


Fillings:
Red bean or mung bean paste or
Lotus seed paste

Optional choice, you can also add salty egg yolks if you like.
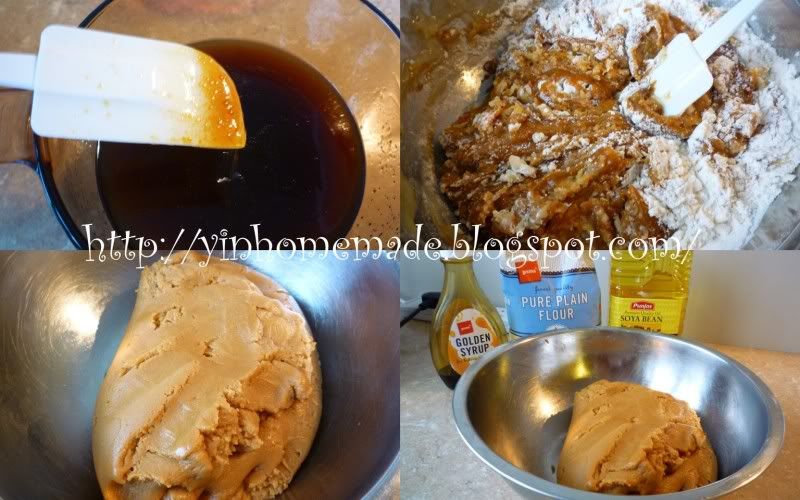

Method
Pastry:
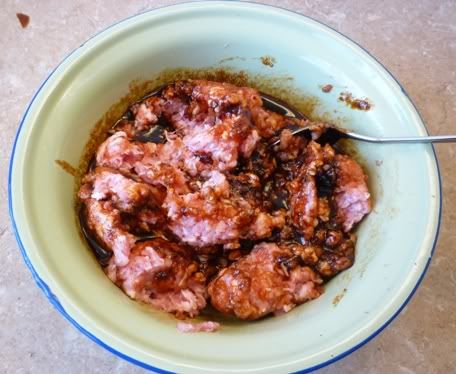
  1. Combine golden syrup , lye water and oil together.
  2. Sift flour, make a well and pour syrup mixture into it.
  3. Mix well and set for 2 hours.

  4. Scale pastry and filling into one of the following ratio,the ration much depends on the size of your mould and your liking.
    45g: 50g (The photo showed is 45g: 50g)
    50g: 70g,
    30g: 60g
  5. Coat pastry over the filling, dust with flour and put into mould, press and knock out.
  6. Pre-heat oven and bake at 200ºC for 5 minutes.
  7. Remove from oven and glaze with beaten egg. Do not over-brush with egg on top of the moon cake as it might affect the design on its surface. (I had this problem, some of the mooncakes not so nice due to this)
  8. Change oven heat down to 150 ºC and bake for 15 minutes. Immediately take it out.
  9. Keep in container and leave to set for 2-3 days before serving.

材料:
面粉600克
食油200克
糖浆360克
碱水2茶匙
鸡蛋1个 (打散)


馅料
红豆或绿豆粘或莲蓉
如果你喜欢,你也可以加入咸蛋黄,


方法

皮馅作法:

把糖浆,水,油和碱水搅拌一起。
筛面粉,倒入糖浆搅拌均匀,搁置2小时。

以下皮馅和馅料的比例取决于你的模具和你喜欢的大小

45克:50克(照片显示是45:50克)
50克:70克,
30克:60克

将每份面团压扁,放入豆馅,将面皮用虎口慢慢向上推至收口
月饼模撒入薄薄一层面粉,将包好馅料的面团压入模子中,左右敲打一次,便可将成形的月饼打出。预热烤箱200º C 摄氏, 放进烤5分钟。取出用毛刷轻轻刷上一层调好的蛋汁再放入烤箱。烤箱的温度减少到150℃,再烘烤15分钟。立即取出来。
静置2-3天才可以吃

Monday, September 13, 2010

TIRAMISU提拉米苏

 @12th September 2010


I used to regard Tiramisu as a Japanese dessert, not until I read from a food magazine, saying that Tiramisu literary means pick me up in Italian word and it is one of the most popular Italian cakes!

To me simplicity is one of my main mottos in cooking; hence I wasn't keen to attempt any dishes which I deem complicated with lots of ingredients and need a lot of skills in it. Initially, Tiramisu was classified under that category.

However not until Helen, another cooking member of mine who specialized in baking demonstrated making this heavenly Italian dessert, then only I realized the process was not that difficult after all.

So, I had my first attempt last Sunday morning, at night I took out and served the dessert at a friend's house and you know what? The cake walloped by the kids within minutes.

Comment from Ray for that night was: "One of my happiest time for tonight is eating delicious cheesecake and playing hide and seek and chess ………."

Now, sharing below the recipe from Helen, hope you able to capture your love one's tummy with this too :-P

Wednesday, September 8, 2010

Assam Pedas Salmon fish head 亚叁鱼头


Assam Pedas fish head is one of my favorite curry dishes which I often eat back home. Since we moved here, I seldom get the chance to eat spicy dishes, not to mention authentic Malaysian Asam Pedas. In fact locating a nice Malaysian Restaurant is not easy too.


With so many Asian grocery shops in Auckland, getting spices like curry powder, tamarind or even belacan (shrimp paste) is not an issue at all. In fact, I can even find Malaysia's brand curry powder and my hometown Penang made belacan! So, with all these ingredients easily available no excuse for me not to cook it when I really crave for it especially during cold winter right ? :-P

Below is the recipe I used to cook my Asam Pedas using Salmon Fish head.


Assam Pedas Salmon fish head 亚叁鱼头

Ingredients:
2 salmon fish head
lady fingers(okra) /eggplants
1 tomato (cut into wedges)
2 tablespoon of fish curry powder
2 sprigs of daun kesum (Vietnamese mint/Vietnames coriander)
5 tablespoons of cooking oil
1 tablespoon of palm sugar/sugar
Salt to taste
Spice Paste:
1 clove garlic
1 stalk of lemon grass (white part only)
4 shallots
5-8 dried chillies (depends how spicy you like)
1/2 tablespoon of belacan (prawn paste)
Pound the spice paste with mortar and pestle or grind them in a food processor. Set aside.


Tamarind Juice:
1 1/4 cup of water
Tamarind pulp (size of a small ping pong ball).


Soak the tamarind pulp in warm water for 15 minutes. Squeeze the tamarind pulp constantly to extract the flavor into the water. Drain the pulp and save the tamarind juice.
Method:

  1. Heat oil and fry the spice paste for 2 minutes or until fragrant.

  2. Add the tamarind juice, fish curry powder and bring to boil.

  3. Add the tomato wedges and okras and bring to boil.

  4. Add the fish, salt, and palm sugar/sugar.

  5. Simmer on low heat for 5 minutes or until the fish is cooked.
Serve hot.


配料:

2头三文鱼头
羊角豆(秋葵,茄子
1
番茄(切成楔)
2
汤匙鱼的咖喱粉
2
片越南薄荷/香菜
5
汤匙食油
1
汤匙黄糖/ 或白糖
盐味
香料:
全部香料研磨。备用。大蒜
1
棵香茅(只要白色部分)
4
青葱
5-8
干辣椒(取决于你如何喜欢吃辣)
1 / 2
汤匙虾膏
亚叁/罗望子果汁:
1 1 / 4
杯水
亚叁/罗望子果肉(一个小乒乓球大小)
把亚叁肉在温水中浸泡15分钟,不断挤压提取亚叁水。汁待用。
 
方法

1
。热窝下油把香料爆香2分钟。
2
。添加亚叁汁,咖喱粉及煮沸。
3
。添加番茄和洋角豆并煮沸。
4
。添加鱼,盐和糖。
5
。慢火煮5分钟或直到鱼熟。
趁热食用。

Banana Chocolate Chip Muffins

Yesterday, my computing classmate asked me for banana muffins recipe. So, follow-up on Chocolate muffins making, this is another super easy muffins recipe that you can try too.
Banana Chocolate Chip Muffins
Baked @ 07/08/2010
Ingredients:
  • 1 1/2 cups all purpose flour (Optional to replace with self- raising flour) 
  • 1 teaspoon baking soda (Omit If self –raising flour being used)
  • 1 teaspoon baking powder (Omit If self –raising flour being used)
  • 1/2 teaspoon salt
  • 1 1/4 cups mashed ripe bananas (about 3 large)
  • 1/2 cup sugar (original recipe goes for ¾ cup)
  • 1/2 cup unsalted butter (microwave to melt)
  • 1/4 cup milk
  • 2 size 6 (small) eggs (lightly beaten)
  • 1/2 cup chocolate chips
  • 1/2 tsp vanilla essence
Serves 12  


Method: 
  1. Preheat oven to 180 degree C (350 degrees F).
  2. Grease 12 muffin cups or line with muffin papers.
  3. Sift flour into a large bowl add in baking powder, baking soda and salt.
  4. Mashed banana in separate bowl, add in sugar, melted butter, beaten eggs and vanilla essence. 
  5. Mix into dry ingredients until just combined. Do not over-mix! 
  6. Fold in chocolate chips. 
  7. Divide batter among prepared muffin pans; fill it till 3/4 full. 
  8. Bake in the center of oven for about 20 minutes , 15 minutes for small muffins or until muffins are golden brown, test by inserting a skewer into center of muffins if comes out clean muffins ready to take out.  
  9. Cool muffins in tray for 5 minutes before transferring muffins to cooling rack to cool completely.
 Notes:
  1. You can add up to 4 bananas, as the more bananas the moister the muffins.
  2.  For variety of flavor you can add in a handful of walnuts in there.
  3.  If you prefer to have plain banana muffins just omit the chocolate chips and increase the sugar to3/4 cups of sugar.
 配料: 
  • 1 1 / 2杯中筋面粉(可用自发面粉取代)
  • 1茶匙小苏打(省略如果用自发面粉) 
  • 1茶匙泡打粉(省略如果用自发面粉)
  • 1 / 2茶匙盐
  • 1 1 / 4杯 约3个熟的大香蕉
  • 1 / 2杯糖(原食谱为¾杯)
  • 1 / 2杯无盐黄油(微波融化)
  • 1 / 4杯牛奶
  • 2 个鸡蛋(小)(打散)
  • 1 / 2杯 巧克力片
  • 1 / 2茶匙香草精
 制作步骤: 
1。预热烤箱至180摄氏度(350华氏度)。 
2。在模具周围涂油或铺油纸。 
3。面粉筛入一个大碗,加入泡打粉,小苏打和盐。 
4。在另一碗里把香蕉捣碎成泥,加入糖,黄油,鸡蛋和香草精。 
5。把干的面粉配料倒入混合,轻轻翻拌均匀,不要过度搅拌! 
6。倒入巧克力片。 
7。将混合好的蛋糕糊倒入模具,大约 3 / 4满。 
8。放进预热好的烤箱,180度,约20分钟,或直到松饼是金黄色。 
9。烤好后的松饼从烤箱里取出来,稍待5分钟冷却后才脱模。
  
注释:
1。您可以添加最多4个香蕉,香蕉更多松饼会较柔润。 
2。你也可以添加少量的核桃。 
3。如果你只要香蕉松饼,只是把巧克力片省略,把糖增加到3/ 4杯。

Tuesday, September 7, 2010

BBQ Pork (蜜汁叉烧)


Other than Roasted Pork Belly (烧肉) which I had covered in my August posting BBQ Pork (叉烧) also known as Char Siu in Cantonese is another famous Hong Kong style BBQ dish that many like to eat.

At one of our regular lunch sharing gathering with my computing class cooking members, Doris from Hong Kong has taught us the easiest way to make Char Siu which taste like what you can expect in HK BBQ restaurants.

Well, it might not be 100% homemade as we skipped the tedious steps of making Char Siu sauce by using ready-made sauce instead but it produced the same drool-worthy BBQ pork that one hardly resist!
Interested to know more, scroll down and get the recipe, happy trying!.
BBQ Pork (蜜汁叉烧)


Ingredients


Method:


  1. Wash meat and pat dry with paper towel and cut pork fillets into strips
  2. Marinate evenly with Lee Kum Kee Char Siu Sauce. Initially, the sauce is quite sticky and gluey to spread over fillets. Once being left in the fridge for a while it will get diluted.
  3. Marinate for at least 2 hours, best leave overnight to allow the flavors to seep in (I stored them in covered container and left overnight in fridge).
  4. Pre-heat oven at 230 degree C.(Mine is not fan oven)
  5. Place marinated fillets on baking tray with aluminum foil on the bottom for easier cleaning. Keep marinade aside for basting.
  6. Bake for 10 minutes; flipping fillets over basting with marinade and bake at lower heat at 200 degree C for another 20 minutes..
  7. For better juicy effect, repeat the flipping and basting at least 2 times.
  8. Take out and glaze with honey and change oven mode to grill 180 degree C, return to higher rack to grill for another 5 to 10 minutes or until it is charred but not burnt.
  9. Remove from oven and let cool for a few minutes. Transfer to a cutting board and slice into thin pieces.
  10. You can serve this with rice or wanton noodle or even use as filling for char siu bau (pork bun)


成份
  • 500克猪柳片(梅头肉)
  • 6大汤匙李锦记叉烧酱
  • 蜂蜜(上色)
方法

1。洗净切成猪柳片,用李锦记叉烧酱均匀的腌猪肉。最初,酱是很粘。一旦被留在冰箱一段时间它就会稀释。
2。腌至少2个小时,最好腌过夜,让味道渗入(我存放在有盖容器中,并留在冰箱过夜)
3。烤箱预热至230摄氏度(我的是不是风扇烤箱).
4。将腌好的猪柳放置在底部有铝箔的烘烤盘上。保留腌猪柳
5。
10分钟后; 用夹把叉烧反转淋一点腌汁,焗炉转200度焗20分钟。过程中时不时翻面如果太乾淋一点腌汁。
6。取出
再将蜂蜜涂在肉上上色,放回较高层烤箱里
改为180摄氏度烧烤5到10分钟或直到它被有烧焦的买相为止。
7。从烤箱取出放凉了几分钟
把多余的蜜汁滴一滴,切成薄片。
8。你可以配白饭或云吞面条。


Monday, September 6, 2010

Stir Fried Pumpkin with Dried Shrimp南瓜炒虾米


Over here we always eat veggie or fruit that in season, not only they are fresh but most important they are cheap! Pumpkin is in season and on sales now so that what I served on my dinning table.
Stir Fried Pumpkin with Dried Shrimp南瓜炒虾米


Ingredients:
  • 1/4 of a pumpkin (cut into cubes)
  • 2-3 spoonful of dried shrimp (washed and chopped finely)
  • 3 cloves of garlic (chopped finely)
  • Salt/sugar to taste
  • Cooking oil
  • 200ml water (to simmer the pumpkin)
Method:
  1. Heat wok with some cooking oil.
  2. Sauté chopped garlic until golden color and then add in dried shrimp.
  3. Stir-fry dried shrimp until fragrant..
  4. Add in pumpkin, stir-fry for a 1 minutes.
  5. Pour in water just nice to cover the pumpkin. Cook until pumpkin is tender.
  6. Simmer until water dry up.
  7. Add in a little bit of sugar and a pinch of salt to taste.
  8. Serve it hot with rice.

成份:
  • 1 / 4 粒南瓜切块2-3汤匙虾干(洗净,切碎)
  • 3瓣蒜头(切碎粒)
  • /糖调味
  • 食用油
  • 200毫升水(以煮南瓜)
方法:

  1. 下油烧热镬。
  2. 爆香蒜茸,直到金黄色,然后加入虾米.
  3. 爆香虾米.
  4. 添加南瓜,炒约1分钟。
  5. 倒入水刚刚好将南瓜覆盖。煮至南瓜软。
  6. 煨至水干为止。
  7. 添加一点点糖和少许盐调味。
  8. 配热饭吃。

Sunday, September 5, 2010

Bak Kua 肉干– Malaysian style Pork Jerky


I love to eat Bak Kua , which literary means dried meat in Hokkien (Chinese Dialect). Bak Kua is well-liked snacks in Malaysia, Singapore and Taiwan, it is also one of the popular gift Chinse like to offer to friends and relatives during Chinese New Year.

Over here, the Taiwanese version beef jerky is easier to get then Malaysia bak kua. I do not like Taiwan version because they are harder and dried not like Malaysia type is tenderer. Only recently, I came across one Malaysia Restaurant in Auckland selling them dearly at $21 for 500g!

When I mentioned this to one of my IT classmate also my cooking members Helen, she said she happened to have a recipe making Malaysian style bak kua from a friend of her. Once I got the recipe from her I was so thrilled to learn that the making process is so easy and simple.

 Below was my first attempt of bak kua making using her recipe. The result was superb not to mention the savings that I had made. I calculated the whole expenses from ingredients to utility for baking, the total bill added up to be only $10 for 500g of bak kua, a 50% savings!(Pardon me, accountant by nature, like to do costing hehehe…..)

If you wish to eat fresh and NO PRESERVATIVE bak kua, print out the recipe and start to bake it!

Bak Kua 肉干  


Ingredient:
  • 500g Pork Mince **
  • 2 Tbsp Fish sauce
  • 2 Tbsp Shaoxing wine / Rose wine
  • 1 1 / 2 Tbsp Soy sauce
  • 1 Tbsp Dark soy sauce (soy paste)
  • 1/2 cup Sugar  
** You can replace pork with beef or chicken. If lean mince being used prefer to add some cooking oil when marinate.
  
Method:
  • Marinate pork mince with above ingredients and mix well by stirring in one direction until the mince becomes gluey. Best to leave overnight in fridge to bring out the flavor or at least 2 hours.
I marinate overnight
  • Prepare a piece of aluminum foil, a clean plastic sheet (can cut out from plastic bag) or plastic wrap.
  • Placed pork mince in center of aluminum foil, covered with plastic sheet/wrap, first slightly flatten the mince using hand.
  • Then use a rolling pin lightly flatten the mince, this is to even out the thickness of meat to enable better grill effect.
  • Pre-heat the oven about 150 degrees Celsius, take off the plastic sheet, transfer the meat along with aluminum foil to a baking tray.
  • Bake the meat in center of oven for 12 minutes.
  • After 12 minutes, take out the tray, there will be gravy, ignore and place it aside, continue with other batch of meat at the same temperature until all cooked first.
  • Once finished with last batch of meat, return to the first set of meat, by then the gravy might has been absorbed back. At this time, turn over the dried meat to another side.
  • Transfer back the meat to the oven at higher rack. This time change the oven heat mode from bake to grill, and grill for another 8-10 minutes or until it has some charcoal effect.
  • Take out the grilled meat and leave it aside to cool down before cutting into small strips.
  • Great snacks and can be great to go with sandwiches.
      
材料:
  1. 猪绞肉 ** 500g
  2. 鱼露 2 Tbsp
  3. 绍兴酒/花雕酒 1 1/2 Tbsp
  4. 酱油 1 1/2 Tbsp
  5. 黑酱油(酱油膏) 1 Tbsp
  6. 半杯
** 您可以拿牛肉或鸡肉取代猪肉。如果使用瘦肉腌时添加一些食用油

方法:
  1. 首先把所有的调味料和绞肉拌匀,一个方向搅拌上劲,要成起胶状
  2. 然后准备一张锡箔纸,还有一个干净的塑胶袋(剪开),也可以用保鲜纸,我个人觉得塑胶袋比保鲜纸好控制。
  3. 在锡箔纸中央放上大约一杯的绞肉,盖上塑料袋,先用手慢慢的推开,然后再用擀面杖轻轻擀平,这个步骤是为了让肉干的厚度平均,烤出来的口感才会比较好。
  4. 然后烤箱预热大约 150摄氏度,把塑料袋拿开,把锡箔纸搬到一个烤盘上,入烤箱烤12分钟.
  5. 12分钟后拿出来,这个时候会有很多肉汁,不必理会,把它放一旁,然后相同温度把其他的肉干全都先烤熟。
  6. 等所有的肉干都烤熟之后,第一盘的肉干已经把刚刚流出来的肉汁又都吸收回去了,这个时候,整片肉干翻面,入烤箱 grill 高火档,烤8-10分钟,直至有碳烤的效果,颜色漂亮就好了。 

Friday, September 3, 2010

Chocolate Chips Muffins


Frankly, I'm not really into fancy delicated baking. Takes too much of time to prepare and key point is my man at home not a sweet tooth lover and will not appreciate them except my boy.
So, every time when I'm thinking of trying out new bakery, I'm always worry how to finish the whole cake as Ming Ray and I can only eat that handful. So, friends who lived nearby me will benefit from it, am I right Cheng Ee?  :-P
For baking my fave is making Muffins, because it is so easy to make by merely mixing the dry and wet ingredients and not required much skill to make them even a five years old can do it with your supervision. The most important thing is they can be ready to stomach in within half an hour!
Here is Ming Ray's favourite - Chocolate chips Muffins
Baked @ 30/05/2010
Wet Ingredients:Dry Ingredients:
  1. 2 eggs
  2. 1 cup (220 g) sugar
  3. 1 teaspoon vanilla essence
  4. 2/3 cup (160 ml) milk
  5. 2/3 cup (150 g) butter (microwave to melt)
  1. 1 cup (110 g) all-purpose flour (or 1 cup self raising flour and omit baking powder)
  2. 2 teaspoons baking powder
  3. 6 tablespoons unsweetened cocoa powder
  4. 120 g semi-sweet chocolate chips (optional)

Served : 6 XL muffins or 12 M muffins.

Method
 Preheat oven to 180 deg C for 15 minutes.
  1. Grease 6 large muffin tins or cups (paper muffin bake cups are recommended) or 12 medium cups.
  2. Prepare the wet ingredients in a medium bowl. Beat eggs with sugar, add in vanilla, milk and fold in the melted butter.
  3. For dry ingredients, sieve multipurpose flour in a bigger bowl and add cocoa powder, baking powder. If self raising flour being used, omit the baking powder.
  4. Make a center well in dry ingredient and pour in the wet ingredient and mix well. Do not over mix!
  5. Add chocolate chips into the batter ,keep some to sprinkle on top at last 5 minutes of baking time.
  6. Bake at 180 degrees C until a wooden pick inserted in center comes out clean, estimated 30 minutes for XL muffins, 20 minutes for medium size muffins.
  7. Chocolatge chips still visible if sprinkle on top @ last 5 minutes
  8. The Chocolate Muffins may be frozen, before serving microwave few second and it will taste as nice as freshly baked.

Notes:
  1. If you wish to use less saturated fat, try substituting ½ the butter with a good quality vegetable oil.
  2. If you wish to have a strong chocolate flavor you can add 1-2 more tablespoons of cocoa powder.
  3. You may add vanilla or white chocolate chips instead or regular ones.
  4. Add chocolate chips at the last five minutes, so it will just stay on top of the muffins and more presentable.

Kiam Chai Boey (Stew Salted Vegetables) 菜尾

Chai Boey literally means leftover dishes in Chinese Hokkien dialect. This is one of the famous Nyonya dishes especially in Penang, Malaysia

This dish usually come handy to cook after festive celebrations like Chinese New Year reunion dinner or wedding dinner, where you can get hold of sumptuous leftover meats of chicken, duck and roasted pork legs. The cooking is easy with just throwing all the meats into a pot along with salted vegetables, green mustard as main veggie added some spice and stew under low heat for hours. The sour taste of the soup is a real appetizing dish to serve.


菜尾是槟城娘惹名菜。起源早期在办完喜宴后,将宾客未用完的餐点全部打包,然后鸡,鸭,鱼,肉各类山珍海味,添加不同类型的蔬菜例如芥菜,酸菜,白萝卜,大白菜等等,并加入少许辛香调味再经低温慢火煮,一大锅酸酸辣辣的菜尾就这样的完成。


Over in Aucklandvery rare for us to have leftover, our leftover is normally JS's lunch for the next day at his office.
So, for me to make this dish I have to use fresh ingredient instead. I discovered replacing roasted pork legs which is one of the main Chai Boey's meat ingredients with smoked pork hock is equally tasty. So, below is my improvised version of Chai Boey or so call fresh Chai Boey instead? :-P

 Chai Boey菜尾


Ingredients
  • 1kg leftover roast chicken and duck parts, roasted pork and roast pig trotter. Else replaced by smoked pork hock.
  • Mustard green (at least 2 heads)
  • 1 packet salted vegetables (optional you can just use more Mustard green)
  • 2 large carrots (cut into chunks),
  • 3-4 Tomatoes
  • 5 cloves Garlic
  • 1 big onion
  • 3-4 pieces ginger
  • 6 Dried/Red chili (soaked use whole)- (optional)
  • Chinese mushrooms (soaked)
  • 2-3 pickled plums (optional)
  • Half cup Tamarind juice/pulp (soaked) ( optional
  • 2 cups Water - (enough to cover all the ingredients)
  • 2 table spoon Oyster sauce
Cooking Method
  • Cut vegetables into big pieces. Separate stems and leaves.
  • Heat up the pot, add in 2 tablespoon oil and fry garlic, onion, ginger, mushrooms, chilies, pork hock with oyster sauce for 3-5
    min.
  • Throw in the tomatoes, carrots and pour water into the pot and let it comes to a boil.
  • Simmer and cook with medium heat for 30 minutes.
  • Pour in tamarind juice/pulp and boil for 2 minutes to bring out the flavor.
  • Add Mustard green stems, salted vegetables and pickled plums, continue to cook for another 30 minutes. Add vegetable leaves last to avoid over cooked.
  • Continue to simmer for 30 minutes until meat and vegetables are all soften.
  • Season with sugar/salt to taste and serve hot with rice. 
Healthy version tips: (updated August 2013)
  • If you do not like to have so oily Chai Boey,  do away duck and fatty pork hock.
  • You can do away salted vegetables and replace with fresh Mustard green
  • If you do not wish to have too sour Chai Boey, opt out tamarind juice  and just add more tomatoes.


成份
•1
公斤烤鸡肉,鸭肉剩余部分,烧肉和烧猪蹄。(可用熏猪肉/熏猪蹄取代)

芥菜(至少2头)
一包咸菜
•2
个大萝卜(切块),
•3-4
西红柿
•5
瓣大蒜
•1
个大洋葱
•3-4
片生姜
• 6
/红辣椒(整个)(可选)
•2
茎香茅(碎)(可选,我没放)
中国香菇(泡)
•2-3
腌梅子 (可选)
罗望子汁半杯(浸软)(可选, 我没放,用西红柿代替)
•2
杯水 - (足以涵盖所有成分)
•2
汤匙蚝油


方法

切蔬菜成大块。分开茎和叶。
热锅,加入2汤匙油,用蚝油酱炒蒜,葱,姜,香茅,蘑菇,辣椒,肉为3-5分钟。
加入西红柿,胡萝卜和水倒入锅里,让它煮沸。
并中火煮30分钟。
倒入罗望子汁煮2分钟,带出的味道。
加入芥菜茎,咸菜和腌梅子,继续煮30分钟。才加蔬菜叶子,避免过分煮熟。
慢火煮30分钟,直到肉和蔬菜都继续软化。
最后加入/调味,配饭吃。


健康版本2013年8月更新
如果你不喜欢吃这么油腻菜尾,减少放鸭肉肥猪
可以不放咸菜,新鲜芥菜
•如果不喜欢吃酸,选择不放只需添加多西红柿

LinkWithin

Related Posts with Thumbnails