Monday, August 30, 2010

Oven Baked Salmon 焗三文鱼


What on our dinner table tonight? Oven Baked Salmon!

Salmon is one of our favorite fish dish even when we were back home in Malaysia. However, back then we seldom have the opportunity to buy fresh Salmon at wet market. For us to eat nice salmon we need to patron fancy Japanese Restaurant and we can't seem to afford to do that often.

But ever since we moved here, Salmon seem to be a regular dish, whenever salmon on offer I will grab them. Salmon is full with healthy proteins and omega-3 fatty acids and is really a rich and healthy meal to serve as dinner.

The best way to cook salmon is also the simplest way to cook salmon with just merely sprinkle some seasoning and chuck into oven and baked!


Oven Baked Salmon烤鲑鱼
Baked Salmon Steaks @ 30/08/2010
Prep Time: 10 minutes
Cook Time: 20 minutes
Total Time: 30 minutes

Ingredients:

  1. 2 Salmon Steaks 
  2. Finely crushed garlic 
  3. Sand Ginger powder 沙薑粉 or ground ginger 
  4. 1 tsp Worcestershire sauce 
  5. Pepper ( to your taste) 
  6. Salt (to your taste) 
  7. 1 teaspoon Olive oil 
  8. Half lemon – for juice 
  9. Herbs for garnishing – Parsley, thyme

Preparation:
  1. Pre-heat oven to 200 C degree.  
  2. Wash and clean Salmon steaks, pat dry with paper towel.  
  3. Season salmon steak on both sides with ingredient 1 to 6. 
  4. Place steaks on top of aluminum foil in a baking tray, smear Olive oil on the steak and let the oil greased the foil.  
  5. Bake in the center of oven for about 20 minutes. 
  6. Test with a skewer, if clean skewer being taking out the fish is cooked.
  7. When serve, cut half lemon and zest with some squeezed lemon juice.
  8. You may add some herbs on top of steaks such as parsley, as I happen to have parsley in my garden, any herb you like works fine.


What my food critic said on this dish?
Yummy! Yummy! Yummy .............. 3 thumbs up by Ming Ray :-P

Sunday, August 29, 2010

Kaya (Coconut Egg Jam)

For many Malaysian, toasted bread with kaya and butter, is another signature breakfast served in Malaysia kopitiam other than Nasi Lemak.

After moving to Auckland, our toasted bread here is always goes with butter or peanut butter jam. I'm ok with it because I'm not keen lover of Kaya but my boy doesn't. Well, we can find the imported Kaya at Asean grocery stores in Auckland but the price is not cheap and you can imagine it is not fresh with preservatives.

I had tried to make kaya once with 2 of my Malaysian wives group friends Cheng Ee and Cheng Im, but we found the traditional way of cooking was so tiring with hours of standing and stirring over the stove. Worst part was after such tedious process, to our disappointment our kaya came out lumpy and not smooth mixture.

Then I recalled one of my friend's mother-in-law mentioned fast way of making kaya using microwave. I decided to search online for that method. Finally, I managed to locate a few good links showing simple way of making kaya with microwave and I tested it and I did get a wonderful smooth kaya in 30 minutes time! Sharing below is the recipe I adopted for my trial making.

  Kaya Making with Microwave
Caramel Kaya
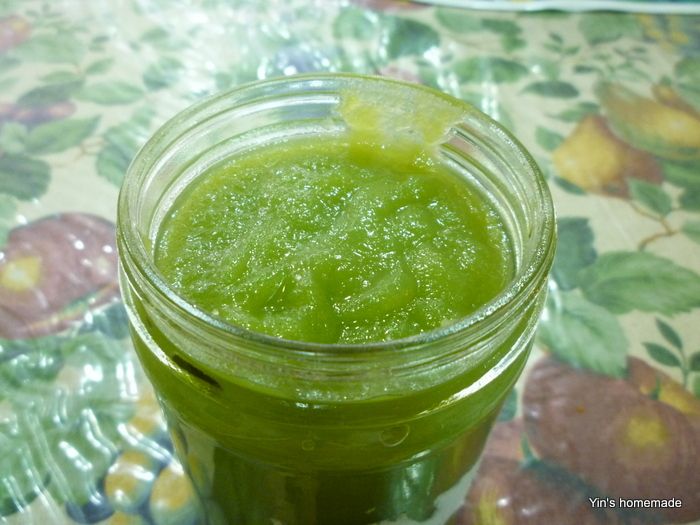
Pandan Kaya

Oven Baked Pork Chops 焗猪扒


For dinner at home, I prefer to cook simple, easy meals with least preparation as possible.
Below is an easy meal to prepare, after pop in the oven, set your timer, let it cooks in the oven while you can freshen up yourself before serving.

  Oven Baked Pork Chops recipe
Ingredients:
  1. 4 pork chops with/out rind
  2. 1 egg (lightly beaten)
  3. 1 cup of breadcrumbs
  4. 3 tablespoons of soy sauce, or 1 tbsp Worcestershire sauce, 2tbsp soy sauce
  5. 1 tablespoon of water
  6. ½ teaspoon of garlic powder or finely crushed fresh garlic, or to your taste
  7. Pinch of ground ginger.
  8. 1tsp Mustard (optional)

Notes:
For variation of flavour, you can opt to replace soy sauce to salt, pepper and  five spice .


Method:


  1. Wash and clean the pork chop and pat dry with paper towel.
  2. If pork chops with rind being used, slit the rind about 1-2cm gap to get a crispy rind when bake.
  3. Combine egg, soy sauce, water, ground ginger and garlic powder together in a plate.
  4. Dip the pork chops into the egg mixture, marinade the pork chops and leave in the fridge for at least half an hour.
  5. Sprinkle breadcrumbs on waxed paper/big plate.
  6. Coating the marinated pork chops with breadcrumbs evenly on each side before bake.
  7. Arrange coated pork chops on greased baking tray or layer with baking paper.
  8. Bake at 180°C for 20 minutes, turn and bake for another 20 minutes or until the chops are tender and no longer pink.


Friday, August 27, 2010

Butterfly Puff (瑚蝶酥)

Are you looking for a simple, fast and easy baking ideas for snacks? Not good at baking but needed to make some baking for your kids' party? No worry, below is a great idea contributed by my Hong Kong friend Vera whom is very good at making snacks and desserts.

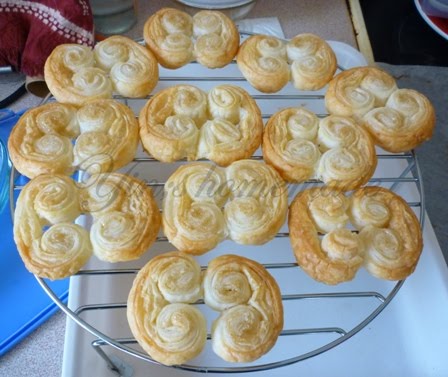
Butterfly Puff (瑚蝶酥)
Butterfly puff by Vera @ 22/07/2010
Following up on my previous recipe on Egg Tarts. For my first batch of egg tarts making, the excess trimmed puff pastry, I turned them into above butterfly puff as shown by Vera during one of our cooking and lunch sharing session.

However, I mistakenly placed the spiral side outward instead of inward as made by Vera. But my version seemed more like butterfly then Vera right? :-P


Ok, enough of talking, here is the recipe :

Ingredient:
  • Flaky puff pastry
  • Coffee sugar/Brown Sugar - to your taste
  • Ground Cinnamon (optional)
  • Butter
  • Egg (lightly beaten for glazing)
Method:

1) Spread butter on the puff sheet.
2) Sprinkle brown or raw sugar and Cinnamon on the puff sheet.
3) Roll both left and right side of the sheet to meet at center of the sheet.
4) Cut the rolled pastry into small strips.
5) Place 2 strips of pastry into butterfly form.You can either face the both spiral sides face to face or face out.


6) Glaze the strips with eggs for golden effect.
7) Baked @ 180 degree Celsius for 15 min or till golden brown.


My butterfly puff served @ 15/08/2010


Wednesday, August 25, 2010

Crispy roasted pork belly (脆皮烧肉)

What's for dinner tonight?
Ming Ray's favourite's Crispy roasted pork belly 脆皮烧肉!
 
Ever since May 2010 when my computing classmate Jenny from Hong Kong, taught me the easy way of home baking crispy roasted pork belly (脆皮烧肉) , we no longer need to patron local Chinese restaurant every week for this dish, great deal of $ has been saved. It has also became one of my signature dish among my Auckland friends.

Combining efforts from online recipes, I managed to improvise a simple yet fool proof recipe to share.

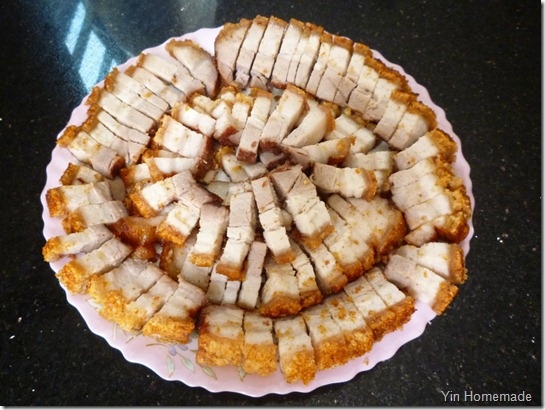
Crispy roasted pork belly (脆皮烧肉)
I'm glad this recipe gets featured in Group recipes homepage for one of their best of week recipes 16/10/2010. http://www.grouprecipes.com/
 

May 2014 updates :
Just noticed that, I had used this recipe for the last 4 years and I must admit it has since be my signature dish serving on my dinner table every now and then especially during festive occations, it serves to be a routine dish.
Hubby has even master the skill in cutting and presentation too, you can tell from this photo:
roastedporkbelly

Ingredient:

Pork Belly 五花腩- about 1 kg
Coarse salt 粗鹽

Seasoning 燒肉醃料
  1. Shaoxing wine/Cooking wine 紹興酒 1湯匙 - 1 tbsp 
  2. Salt 幼鹽 - 2-2.5tsp
  3. Sugar 糖 1/2 tsp
  4. Chicken Stock powder 雞粉 - 1/4tsp
  5. Sand Ginger powder 沙薑粉 1tsp - optional
  6. Five spice powder 五香粉 1/2-1tsp – I put 1 tsp
Preparation Step:
  1. Wash the pork belly and remove any hair on the rind/skin, pat dry with paper towel.先将五花腩皮上的污秽物及拔除毛洗净抹干水.
  2. Prick/poke the rind as many holes as possible, this is important step to make the rind crispy. I poke holes using the sharp tip of the veggie and fruit peeler. 用猪插在表面刺松皮, 剌多都不怕,因为剌少会影响皮脆。

  3. Made a few slits on the meat for better absorption of seasoning.把肉开缝以更好地吸收调味。
  4. First coat the rind and pork belly meat with cooking wine, then only marinate the meat with above seasoning but not the rind/skin. 腩肉都涂抹上绍兴酒和腌料, 记住腌料只涂抹在肉上,皮是不用腌的.

  5. Air dry the whole pork belly openly in the fridge with the rind facing upward. Ok to leave in the fridge for days until you wish to bake. Best to leave it for at least 1 day to have good crispy result. 放进冰箱风干,  至少一天。
Baking Step 烘烤步骤
  1. Wrap the pork belly with aluminum foil and place in a baking tray, make sure the height of the foil is 1 inch  higher than the pork belly. 用钖纸先包在密五花腩, 留下猪皮部位不用包着.
  2. Coat a layer of coarse salt fully covered on the rind, this to make the water at the rind surface to evaporate to achieve crispy skin effect. 包好腩肉后, 在猪皮上倒下约一吋厚粗盐. 用盐焗是因为要令到猪皮表面水份全部蒸发, 达至表皮松脆效果, 所以没有被粗盐覆盖的地方会较韧.
  3. Pre-heat the oven at 230 degree celcius for 15 min. 先将焗炉以230度预热15分钟.
  4. Bake the pork belly at the center of oven for 50 minutes. 将包好既腩肉放入焗炉内焗50分钟.
  5. After 50 minutes, take out the pork belly and get rid of the coaarse salt. 过了50分钟后取出将盐起走,
  6. Change the bake mode to grill and reduce the heat to 210 degree celcius and put back pork belly at higher rack of the oven to girll for another 20 minutes or until the rind is crispy. 更改焗式变烤式,减少热至210度摄氏再将烧肉放回焗炉再以210度烤20-25分钟, 烤至猪皮松脆.
  7. From my experience the rind will start crackling after 15 minuets at grill mode. 以我的经验,腩肉外皮会在15分钟以后开始脆皮。
  8. Take out from oven and let it cool before served. 烧肉稍凉后斩件上碟. 完成

Tuesday, August 24, 2010

Portuguese Egg Tarts(葡式蛋挞)

Few months ago, a Shanghai friend of mine Ariel has given me a great idea of making egg tarts using ready made pastry. She shared the egg tarts custard recipe with me.

Initially, I started off by using block sweet short crust pastry, but I wasn't good at rolling into even sheet  pastry, the egg tarts pastry was too thin, I couldn't get a nice egg tarts at all. However, the custard filling tasted great though. Thankfully my two guys were not picky and ate them all, my boy Ming Ray even complimented them delicious despite the ugly looking tarts. After 2 attempts I gave up.

Only recently, when one of my computing class cooking members Vera introduced us on how to use ready rolled flaky puff sheet that prompted me to give it a try again using ready rolled pastry sheets.

Last Sunday I organised a high tea, thank god my 3rd attempts of egg tarts making didn't fail me. I managed to come out a close version of Portuguese egg tarts to serve my guests. I was delighted to get my man, my no# 1 food critics to rate them at pro standard and all the kids love them!

The following day, I finished off the pastry and fresh cream by making another batch. and brought to my computing class and pleased that my cooking members liked them too and urging me to share out the recipe.

You can find the recipe below. Well, this may not be 100% homemade version of egg tarts, as I used the ready made pastry from the store. But I know many of you will prefer using this method because is fast, simple  and easy to made!  Happy trying.

Egg Tarts with Ready Rolled Flaky Puff Pastry
Baked @ 23/08/2010
Ingredient:
Ready Rolled Flaky Puff Pastry

Custard Filling
Number of Egg Tarts Serve
8
12
28

1. Size 6 Egg Yolks

50g

75g

175g

Size 6 Egg Yolks(unit)     

3

5

7

2. Milk

50 ml

75 ml

175 ml

3. Fresh Cream

90 ml

130 ml

300 ml

4. Castor Sugar

30g

50g

120g


Method:

1. Cut dough with a cookie cutter that is just a bit smaller than your tart tin in size. If no egg tart tin use muffin pan to replace.
2. Lightly grease the egg tart tins/muffin pan. Line dough in the middle of tart tins, one by one. Lightly press the dough with your thumbs, starting from the bottom then up to the sides. While pressing the dough, turn the tart tin clockwise/anti-clockwise in order to make an even tart shell. Trim away any excess dough.  
3. Warm the milk, pour the sugar into the warm milk to dissolve. 4. Pour the cream warm milk mixture. 5. Beat the egg yolks; sieve the egg yolks into the milk mixture. 6. Fill the pastry with about 80% of the pastry.
7. Preheat oven to 200C.Bake tarts for 10-15 minutes until the edges are lightly brown.
8. Reduce the heat to 180C. Keep an eye on them. Once custard being puffed up a bit, pull the oven door open about 2 to 3 inches. This method is to avoid custard from being puffed up too high. The custard would collapse once they are cooled down otherwise.
9. Bake for another 10 to 15 minutes until the custard is cooked through or the pastry is brown. Insert a toothpick into the custard, if it stands on its own, it’s done.
The first successful batch served on Sunday 22/08/2010 
The subsequent batch 23/08/2010
For the excess trimmed pastry, Ming Ray and I made into a
 "Ginger puff man"

LinkWithin

Related Posts with Thumbnails